How to Use Natural Light for Outdoor Portraits
Reflected light can add depth and a fresh dynamic to your natural light portraits. Sometimes naturally occurring reflected light can be used, but by far the easiest way is to use a reflector. The most important thing is to learn to see the light falling on your subject and then control the strength and quality of the reflected light you are adding. Here are some tips to help you learn to use a reflector.
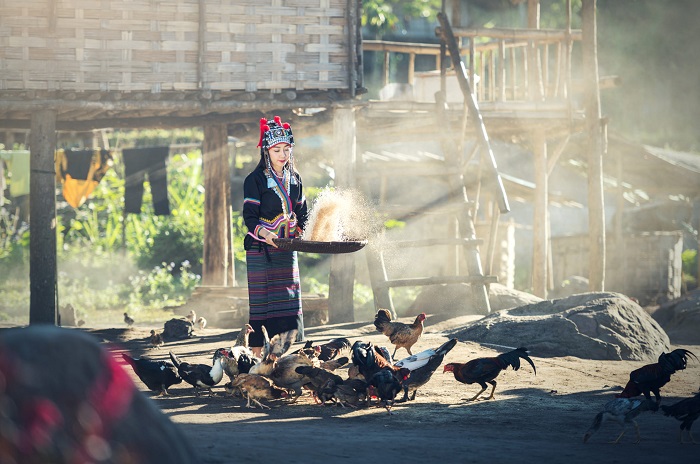
Photo by Sasin Tipchai
Naturally reflected light
When making candid portraits, I’m always looking to see if some reflected light is affecting my subject. At the right angle, any surface can bounce light back onto your subject. You can train your eye to see it. It may be light bouncing off a nearby wall or pavement, an open newspaper or skeins of yarn. With strong sunlight behind the lady, when she feeds the birds, the light gently reflects her face.
It may be light bouncing off a nearby wall or pavement, an open newspaper or skeins of yarn (as in the photo above).

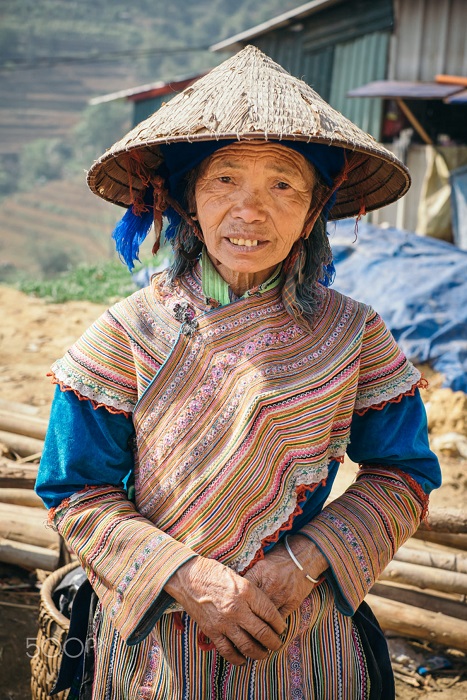
Naturally reflecting light is easier to make use of if you are posing your subjects and have some control over where they are positioned. Finding a location where the sun is hitting a large light-toned neutral surface can provide you suitable reflected light for portraits.
In this photo of the fish vendor at the local fresh market, the light is reflecting off a white painted building behind me. Behind her is an open entrance to a room with no windows, providing a dark background to nicely isolate my subject.
Types of reflectors
When there’s no naturally occurring reflected light, a folding reflector is a fabulous accessory to have on hand. These reflectors are relatively inexpensive and come in various shapes, sizes, and colors. The most efficient are the ones which have multiple reflective surfaces.
Note: you can even DIY and build your own reflector.
These reflectors typically have a sleeve which covers a translucent fabric attached to the foldable frame. The sleeve is removable and reversible with four different surfaces (5-in-1 reflectors). Normally they are white, silver, gold, and black. Some even have more complex reflective surfaces. Learning to use this type of reflector well can take some practice, but it’s worth while for the fresh dynamic lighting it will bring to your portraits.
How to use a reflector
Having someone to hold the reflector is the best way to use it as the direction of light and angle of the reflector in relation to your subject is important. If the reflector is not at the best angle you will have too much or too little light bouncing onto your subject. You may need to coach whoever is assisting you and demonstrate the effect the reflector has, so they can hold it precisely right for the best lighting.
Careful choice of reflective surface for whatever light you are working in is important too. If you are making portraits outside in full sunshine the use of the white reflector surface may be best. It’s likely the silver or gold surfaces will reflect too much light back onto your subject. Don’t be afraid to experiment though, as that is a great way to learn.
Using a reflector in bright sunlight
In the bright sunshine, the person holding the reflector needs to be careful not to bounce strong light into your subject’s eyes as they are searching for the best angle to hold the reflector. That can be most uncomfortable for your subject. It’s a good idea to instruct your subject not to look directly at the reflector. If they have not seen a folding reflector before many people will look at it as it is unfolded.
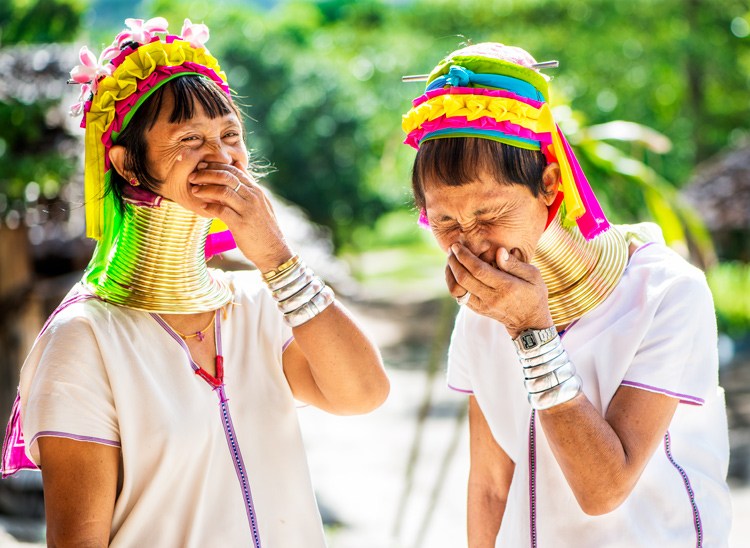 With this photo of the two laughing ladies, my wife was using a medium sized gold surfaced reflector. She is an expert assistant and photographer so she knows how to get the optimal reflected light in most situations. My subjects were standing in the shade of a tree and the reflector was also in the shade, so it was not bouncing back full sunshine.
I find the gold surface works well with Asian skin tones. With the strong back light, the bounce light fills in the shadows nicely reducing the over all tonal range in the photo. Because the reflected light is stronger on the ladies faces, (where I was taking my light reading from,) it is more balanced with the light in the background. The bright sun reflecting off the light colored ground also adds nicely to this photo. If my wife had been standing so the gold reflector was in the full sunshine the light would have been too bright and harsh, blinding our models and creating hard shadows on them.
Using a reflector in soft light
On overcast days a silver reflector will bounce a clean, soft light onto your subject. If you can position your reflector so it balances with the ambient light, gently filling in shadows on the face but not completely eliminating them, you can obtain some very pleasing results.
Varying the angle of the reflector in relation to the light source and your subject will vary the amount of light affecting your subject. You do not need to always have the reflector blasting out the maximum amount of light as this can look very unnatural. Using the white surface rather than the silver side will also reduce the amount of reflected light.
Other uses for reflectors
Black or white surfaces of very large reflectors can make great backgrounds and the translucent inner part can be used as a screen to hold above your subject to block direct sunlight. In the past, I have used this method but now prefer to use my *portable daylight studio to provide a black or white background and filtered back lighting, (in principle it’s the same thing.) I then use my large folding reflector to help control the light on the front of my subjects. The sunlight also reflects off the ground, typically in a northern Thai village the earth is a light color and creates a pleasing reflection. If I have to work on grass we lay down some large sheets of white plastic to avoid having a green color cast in the images.
*Reading Irving Penn’s book “Worlds In A Small Room” was the inspiration for my portable studio which I have used in many locations in the mountains of northern Thailand and occasionally when teaching our workshops.
Conclusion
As you practice using a reflector you will learn to manipulate just the right amount of light onto your subject. At times you might prefer hard light and other times soft light will be more pleasing. Learning to see how light affects your subject and learning to control it will greatly improve your portraiture.
A Post By: Kevin Landwer-Johan
See also: Camera Settings for Street Photography